Build a transaction explorer for Irys
In this tutorial you will:
- Learn how to query Irys and Arweave transactions based on content type, payment token and timestamp
- Build a powerful tool that gives you insights into how Irys is used
- Learn how to incorporate specialized query functionality in your applications
As you build the project, you'll be introduced to the Irys Query package, which greatly simplifies querying Irys and Arweave. Instead of having to use GraphQL, you can now search transactions through a single JavaScript class, you interact with it as you would with any other JavaScript code.

Prerequisites
For this tutorial, ensure you have Node (opens in a new tab) installed and have a foundational knowledge of TypeScript (opens in a new tab) and Tailwind (opens in a new tab).
You don't need to be an expert, but you should be comfortable with basic data types, project creation, component structure, and implementing styling in a project.
Project setup
Navigate to an empty directory and create a new NextJS project with the following:
npx create-next-app tutorial-query-packageWhen prompted, choose all of the default options, including TypeScript and Tailwind.

Installing the Query package
CD into the directory you just created:
cd tutorial-query-packageand install the Irys Query package using npm:
npm install @irys/queryor yarn:
yarn add @irys/queryUI
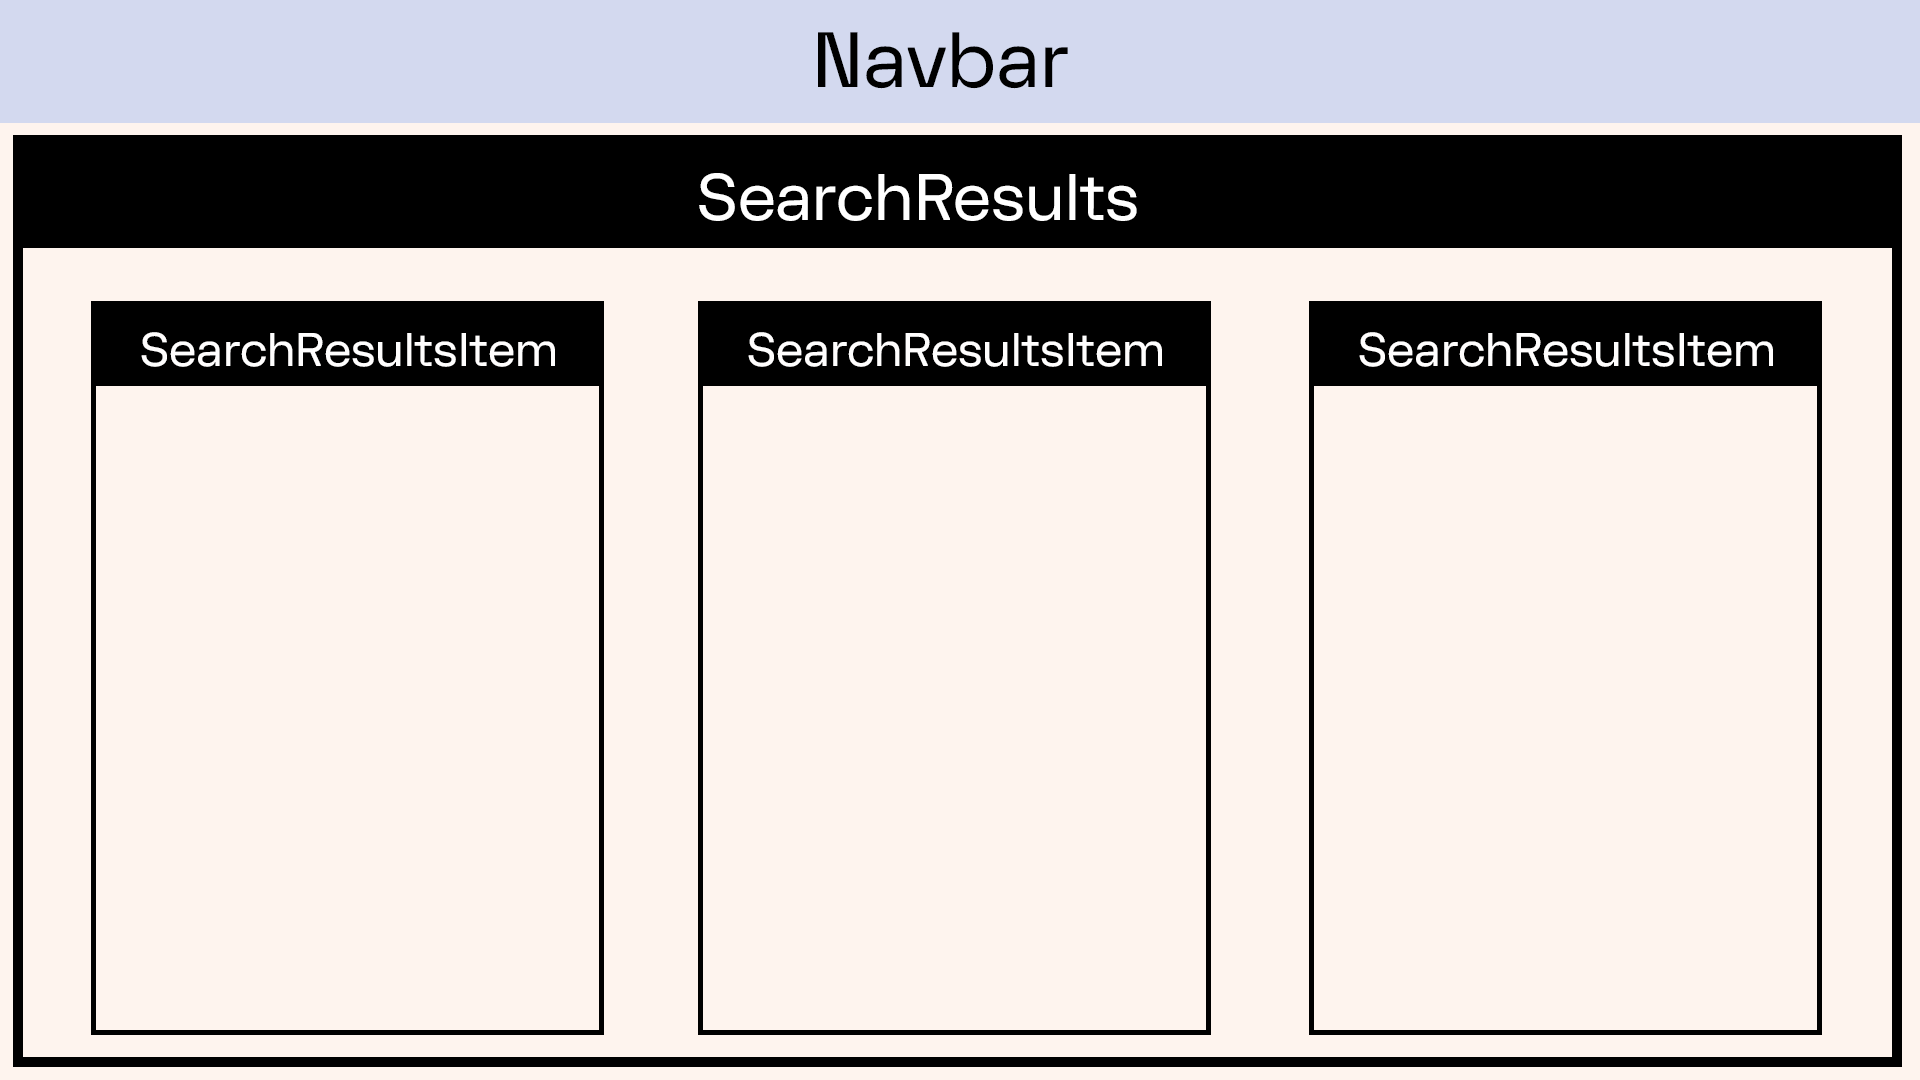
We'll structure our UI beginning with the page.tsx file which then incorporates three additional components:
NavbarSearchResultsSearchResultsItem
The page.tsx file acts as a parent component, hosting these child components and managing shared state. All state is set up in page.tsx and then passed to child components when instantiated.
When a user triggers a search, Navbar state gets transferred down to page.tsx, which then uses the Query package to search for transactions. The resulting data is processed, and each item is rendered in the UI as a distinct SearchResultsItem.
In this tutorial, first, we’ll build out the complete UI, then go back and add in the query functionality. If you’re only interested in how to integrate the Query class, feel free to skip ahead to “Query Functionality”.
page.tsx
Start by modeling the application data using TypeScript interfaces. The SearchData interface models the parameters required for each search operation, these parameters include:
- Irys node
- Content-Type metatag
- payment token
- a date range
The SearchResult interface models the structure of an individual search result. It includes the transaction ID, creation date, token, and an array of associated tags.
// Models data points used when searching (represented in our NavBar)
interface SearchData {
	irysNode: string;
	contentType: string;
	paymentToken: string;
	fromTimestamp: Date | null;
	toTimestamp: Date | null;
}

// Models the result of a single search
interface SearchResult {
	txID: string;
	creationDate: string;
	token: string;
	tags: any[];
}
With the interfaces defined, we’ll set up the basic page layout, including a Navbar at the top and the SearchResults at the bottom.
Replace the contents of your page.tsx file with the following.
"use client";

import React, { useState } from "react";

import LoadingSpinner from "./LoadingSpinner";
import Navbar from "./Navbar";
import Query from "@irys/query";
import SearchResults from "./SearchResults";

// Models data points used when searching (represented in our NavBar)
interface SearchData {
	irysNode: string;
	contentType: string;
	paymentToken: string;
	fromTimestamp: Date | null;
	toTimestamp: Date | null;
}

// Models the result of a single search
interface SearchResult {
	txID: string;
	creationDate: string;
	token: string;
	tags: any[];
}

const useHome = () => {
	// If true a search is happening and we should show the spinner
	const [isLoading, setIsLoading] = useState(false);
	// If false we have yet to execute a search
	const [firstSearchRun, setFirstSearchRun] = useState(false);

	// State variables for our search params.
	// Set the variables here, and pass them to the Navbar
	const [irysNetwork, setIrysNetwork] = useState<string>("mainnet"); // or "devnet"
	const [contentType, setContentType] = useState<string>("None");
	const [paymentToken, setPaymentToken] = useState<string>("None");
	const [fromTimestamp, setFromTimestamp] = useState<Date | null>(null);
	const [toTimestamp, setToTimestamp] = useState<Date | null>(null);

	// Stores the results of the search
	const [searchResults, setSearchResults] = useState<SearchResult[]>([]);

	// Called when a user clicks "Search" in the UI
	const handleSearch = async () => {};

	return {
		isLoading,
		firstSearchRun,
		irysNetwork,
		setIrysNetwork,
		contentType,
		setContentType,
		paymentToken,
		setPaymentToken,
		fromTimestamp,
		setFromTimestamp,
		toTimestamp,
		setToTimestamp,
		searchResults,
		handleSearch,
	};
};

const Home: React.FC = () => {
	const { isLoading, searchResults, firstSearchRun, handleSearch, ...navProps } = useHome();

	return (
		<div className="min-h-screen bg-background text-text">
			<Navbar onSearch={handleSearch} {...navProps} />
			{isLoading ? (
				<LoadingSpinner />
			) : searchResults.length > 0 ? (
				<div className="pt-5">
					<SearchResults results={searchResults} />
				</div>
			) : firstSearchRun ? (
				<div className="flex justify-center items-center h-screen">
					<p className="text-4xl text-black">No results found</p>
				</div>
			) : null}
		</div>
	);
};

export default Home;
LoadingSpinner
Depending on search criteria and number of results returned, searches may take upwards of a few seconds to execute. While a query is running, we’ll show a simple Loading … spinner in the UI. This component is selectively displayed in page.tsx, and has a simple design with no interactivity or state to manage.
Create a new file called LoadingSpinner.tsx and paste in the following.
import React from "react";

// UI component, shows a "Loading ..." spinner when active
const LoadingSpinner: React.FC = () => {
	return (
		<div className="flex justify-center items-center h-screen">
			<div className="relative w-32 h-32 -mt-60">
				<div className="absolute animate-ping w-full h-full rounded-full bg-primary opacity-75"></div>
				<div className="absolute w-full h-full rounded-full bg-primary flex justify-center items-center">
					<p className="text-black">Searching ...</p>
				</div>
			</div>
		</div>
	);
};

export default LoadingSpinner;
NavBar
The Navbar component is where the user will configure search parameters before passing them down to page.tsx.

Start by defining the properties of the Navbar component using the NavbarProps interface. This includes:
- Network to search ("mainnet" or "devnet")
- Content type
- Payment toke
- To and from timestamps
An onSearch() function is also included, which is triggered when a search operation is initiated by the user clicking Search.
All of these values are passed to Navbar from page.tsx, ensuring state is shared between all components.
interface NavbarProps {
	irysNetwork: string;
	setIrysNetwork: React.Dispatch<React.SetStateAction<string>>;
	contentType: string;
	setContentType: React.Dispatch<React.SetStateAction<string>>;
	paymentToken: string;
	setPaymentToken: React.Dispatch<React.SetStateAction<string>>;
	fromTimestamp: Date | null;
	setFromTimestamp: React.Dispatch<React.SetStateAction<Date | null>>;
	toTimestamp: Date | null;
	setToTimestamp: React.Dispatch<React.SetStateAction<Date | null>>;
	onSearch: () => void;
}
Next, build a custom React hook called useNavbar() that handles all the state setting for the component.
cconst useNavbar = ({ props }: { props: NavbarProps }) => {
	const handleIrysNetworkChange = (e: React.ChangeEvent<HTMLSelectElement>) => {
		props.setIrysNetwork(e.target.value);
	};


	const handleContentTypeChange = (e: React.ChangeEvent<HTMLSelectElement>) => {
		props.setContentType(e.target.value);
	};


	const handlePaymentTokenChange = (e: React.ChangeEvent<HTMLSelectElement>) => {
		props.setPaymentToken(e.target.value);
	};


	const handleFromTimestampChange = (e: React.ChangeEvent<HTMLInputElement>) => {
		props.setFromTimestamp(e.target.value ? new Date(e.target.value) : null);
	};


	const handleToTimestampChange = (e: React.ChangeEvent<HTMLInputElement>) => {
		props.setToTimestamp(e.target.value ? new Date(e.target.value) : null);
	};


	return {
		handleIrysNetworkChange,
		handleContentTypeChange,
		handlePaymentTokenChange,
		handleFromTimestampChange,
		handleToTimestampChange,
	};
};
Now, combine the state management logic with some basic HTML, and you’ve got your Navbar UI. Create a new file called Navbar.tsx and paste in the following.
import Image from "next/image";
import React from "react";

interface NavbarProps {
	irysNetwork: string;
	setIrysNetwork: React.Dispatch<React.SetStateAction<string>>;
	contentType: string;
	setContentType: React.Dispatch<React.SetStateAction<string>>;
	paymentToken: string;
	setPaymentToken: React.Dispatch<React.SetStateAction<string>>;
	fromTimestamp: Date | null;
	setFromTimestamp: React.Dispatch<React.SetStateAction<Date | null>>;
	toTimestamp: Date | null;
	setToTimestamp: React.Dispatch<React.SetStateAction<Date | null>>;
	onSearch: () => void;
}

const useNavbar = ({ props }: { props: NavbarProps }) => {
	const handleIrysNetworkChange = (e: React.ChangeEvent<HTMLSelectElement>) => {
		props.setIrysNetwork(e.target.value);
	};

	const handleContentTypeChange = (e: React.ChangeEvent<HTMLSelectElement>) => {
		props.setContentType(e.target.value);
	};

	const handlePaymentTokenChange = (e: React.ChangeEvent<HTMLSelectElement>) => {
		props.setPaymentToken(e.target.value);
	};

	const handleFromTimestampChange = (e: React.ChangeEvent<HTMLInputElement>) => {
		props.setFromTimestamp(e.target.value ? new Date(e.target.value) : null);
	};

	const handleToTimestampChange = (e: React.ChangeEvent<HTMLInputElement>) => {
		props.setToTimestamp(e.target.value ? new Date(e.target.value) : null);
	};

	return {
		handleIrysNetworkChange,
		handleContentTypeChange,
		handlePaymentTokenChange,
		handleFromTimestampChange,
		handleToTimestampChange,
	};
};

const Navbar: React.FC<NavbarProps> = (props) => {
	const {
		handleIrysNetworkChange,
		handleContentTypeChange,
		handlePaymentTokenChange,
		handleFromTimestampChange,
		handleToTimestampChange,
	} = useNavbar({ props });

	return (
		<div className="w-full p-4 bg-primary sticky top-0 z-50">
			<div className="flex flex-row gap-5 justify-center justify-items-start">
				<div className="flex flex-col">
					<label className="text-text text-xs ml-2">Irys Node</label>
					<select value={props.irysNetwork} onChange={handleIrysNetworkChange} className="rounded-xl px-2 shadow-xl">
						<option value="mainnet">mainnet</option>
						<option value="devnet">devnet</option>
					</select>
				</div>

				<div className="flex flex-col">
					<label className="text-text text-xs ml-2">Content-Type</label>
					<select value={props.contentType} onChange={handleContentTypeChange} className="rounded-xl px-2 shadow-xl">
						<option value="None">None</option>
						<option value="image/jpg">image/jpg</option>
						<option value="image/png">image/png</option>
						<option value="image/gif">image/gif</option>
					</select>
				</div>

				<div className="flex flex-col">
					<label className="text-text text-xs ml-2">Payment Token</label>
					<select value={props.paymentToken} onChange={handlePaymentTokenChange} className="rounded-xl px-2 shadow-xl">
						<option value="None">None</option>
						<option value="Solana">Solana</option>
						<option value="Matic">Matic</option>
						<option value="Ethereum">Ethereum</option>
						<option value="Arweave">Arweave</option>
					</select>
				</div>

				<div className="flex flex-col">
					<label className="text-text text-xs ml-2">From Timestamp</label>
					<input
						type="date"
						value={props.fromTimestamp ? props.fromTimestamp.toISOString().substring(0, 10) : ""}
						onChange={handleFromTimestampChange}
						className="rounded-xl px-2 shadow-xl"
					/>
				</div>
				<div className="flex flex-col">
					<label className="text-text text-xs ml-2">To Timestamp</label>
					<input
						type="date"
						value={props.toTimestamp ? props.toTimestamp.toISOString().substring(0, 10) : ""}
						onChange={handleToTimestampChange}
						className="rounded-xl px-2 shadow-xl"
					/>
				</div>

				<div className="self-center">
					<button
						className="shadow-xl px-5 mt-4 bg-white hover:bg-primary text-text rounded-xl border-1 decoration-black"
						onClick={props.onSearch}
					>
						Search
					</button>
				</div>
			</div>
		</div>
	);
};

export default Navbar;
SearchResults
The SearchResults component is a simple container that fills the bottom part of the search. It first defines two interfaces that model the results of a search.
// Defines the shape of a search result
interface SearchResult {
	txID: string;
	creationDate: string;
	token: string;
	tags: any[];
}

// Defines the properties of the SearchResults component
interface SearchResultsProps {
	results: SearchResult[]; // array of search results
}
It then iterates over these values, and uses them to dynamically build an array of SearchResultsItems components.
Create a new file titled SearchResults.tsx and paste in the following.
import React from "react";
import SearchResultsItem, { Tag } from "./SearchResultsItem";

// Defines the shape of a search result
interface SearchResult {
	txID: string;
	creationDate: string;
	token: string;
	tags: any[];
}

// Defines the properties of the SearchResults component
interface SearchResultsProps {
	results: SearchResult[]; // array of search results
}

// Functional component that receives an array of SearchResult items
const SearchResults: React.FC<SearchResultsProps> = ({ results }) => {
	return (
		<div className="flex flex-wrap justify-center">
			{
				// For each result, render a SearchResultsItem component
				results &&
					results.map((result) => (
						<SearchResultsItem
							key={result.txID} // Unique key
							txID={result.txID} // Transaction ID
							token={result.token} // Token used for payment
							creationDate={result.creationDate} // Creation date							tags={result.tags} // Any associated tags
						/>
					))
			}
		</div>
	);
};

export default SearchResults;
SearchResultsItem

The SearchResultsItem component models a single search result, you’ll instantiate a new one for each result found.
Start by modeling the data that will be shown in the component.
// Describes the structure of a metadata tag
export interface Tag {
	name: string;
	value: string;
}

// Defines the properties of the SearchResultsItem component
interface SearchResultsItemProps {
	txID: string; // Transaction ID
	creationDate: string; // Date of transaction creation
	token: string; // Token used for payment
	tags: Tag[]; // Array of Tags
}
And then combine it with some basic styling to complete the component.
import React from "react";
import toTitleCase from "./utils/titleCase";

// Describes the structure of a metadata tag
export interface Tag {
	name: string;
	value: string;
}

// Defines the properties of the SearchResultsItem component
interface SearchResultsItemProps {
	txID: string; // Transaction ID
	creationDate: string; // Date of transaction creation
	token: string; // Token used for payment
	tags: Tag[]; // Array of Tags
}

// Functional component that displays information for an individual search result
const SearchResultsItem: React.FC<SearchResultsItemProps> = ({ txID, creationDate, token, tags }) => {
	return (
		<div className="flex flex-col bg-secondary shadow-2xl m-2 p-4 rounded-lg w-60">
			{/* Display thumbnail image */}
			<img className="rounded-xl" src={`https://gateway.irys.xyz/${txID}`} alt="Thumbnail" />

			{/* Display truncated Transaction ID */}
			<p className="text-text text-xs mt-5">
				<span className="font-bold">Tx ID:</span> {txID.slice(0, 5).concat(".....", txID.slice(-5))}
			</p>
			{/* Display creation date */}
			<p className="text-text text-xs ">
				<span className="font-bold">Creation Date:</span> {creationDate}
			</p>
			{/* Display token info */}
			<p className="text-text text-xs ">
				<span className="font-bold">Token:</span> {toTitleCase(token)}
			</p>

			{/* List all associated tags */}
			<ul className="mt-3 text-xs">
				{tags.map((tag: Tag, i: number) => (
					<li key={i}>
						{tag.name}: {tag.value.length > 10 ? tag.value.substring(0, 10) + "..." : tag.value}
					</li>
				))}
			</ul>
		</div>
	);
};

export default SearchResultsItem;
utils
Ok, you are almost done, let’s create one quick utility function.
Create a new folder called utils and in it a file called titleCase.tsx. Paste in the following code we’ll use to properly format text in SearchResultsItem. This function accepts any string and returns it properly formatted using title case, the first letter is capitalized while the others are in lowercase.
const toTitleCase = (str: string): string => {
	return str.replace(/\w\S*/g, (txt: string): string => {
		return txt.charAt(0).toLocaleUpperCase() + txt.substr(1).toLocaleLowerCase();
	});
};

export default toTitleCase;
Query Functionality
Having assembled the application's UI, running npm run dev in your CLI now displays a functional UI with a Navbar and a designated area for search results. However, the "Search" button doesn’t do anything as we have yet to build out the handleSearch() function.
Let’s jump back to page.tsx and finish coding the handleSearch() function.
Irys has a mainnet and devnet. When querying,
// Create a new Query object pointing to the node selected by the user
const query = new Query({ network: irysNetwork });
Moving forward, the Query object is configured to exclusively search Irys' transactions and limit the results to 42. The location of the search is determined by the value passed to search(), if you’re modifying this tutorial to search Arweave instead, you would change this value.
Although this tutorial limits results to 42 for simplicity, implementing streaming would enable a continuously expanding page of results triggered by user scroll.
const myQuery = query.search("irys:transactions").limit(42);Next up is where the meat of the query happens. Using the tags(), currency(), fromTimestamp() and toTimestamp() functions, we programmatically set query parameters.
// Set query params based on input in NavBar
if (contentType !== "None") myQuery.tags([{ name: "Content-Type", values: [contentType] }]);
if (paymentToken !== "None") myQuery.currency(paymentToken.toLowerCase());
if (fromTimestamp) myQuery.fromTimestamp(fromTimestamp);
if (toTimestamp) myQuery.toTimestamp(toTimestamp);
And finally, we execute the query by calling it with the await keyword.
// Having configured the query, call await on it to execute
const results = await myQuery;
Here’s the full handleSearch() function, go back to your page.tsx file and paste this function on top of the existing empty function signature.
// Called when a user clicks "Search" in the UI
const handleSearch = async () => {
	// Show the LoadingSpinner
	setIsLoading(true);
	setFirstSearchRun(true);

	// Clear the previous search results (if exists)
	setSearchResults([]);

	// Create a new Query object pointing to the node selected by the user
	const query = new Query({ url: irysNode + "/graphql" });

	// Create a new query pointing to Irys, limit results to 42
	// for purposes of this tutorial, but feel free to change.
	const myQuery = query.search("irys:transactions").limit(42);

	// Set query params based on input in NavBar
	if (contentType !== "None") myQuery.tags([{ name: "Content-Type", values: [contentType] }]);
	if (paymentToken !== "None") myQuery.currency(paymentToken.toLowerCase());
	if (fromTimestamp) myQuery.fromTimestamp(fromTimestamp);
	if (toTimestamp) myQuery.toTimestamp(toTimestamp);

	// Having configured the query, call await on it to execute
	const results = await myQuery;

	// Iterate over the search results, adding each to an array of SearchResult
	const resultsBuilder: SearchResult[] = [];
	for (const result of results) {
		const newEntry: SearchResult = {
			txID: result.id,
			creationDate: new Date(result.timestamp).toLocaleString(),
			token: result.currency,
			tags: result.tags,
		};
		resultsBuilder.push(newEntry);
	}
	// Store SearchResult array in state
	setSearchResults(resultsBuilder);

	// Turn of the LoadingSpinner
	setIsLoading(false);
};
What’s Next?
Excellent job! In under an hour, you've constructed an explorer that showcases content uploaded to Irys in real time. The flexibility of the Query pacakge opens a world of opportunities for creative Web3 development.
-
You could expand on this tutorial to allow more advanced tag searching or even repurpose it to query Arweave directly instead.
-
When uploading to Irys, you have complete freedom over which tags you add to each transaction. Using custom tags you can build semi-relational models within your data and then use these models to construct complex queries, analyze data patterns, or create personalized user experiences.
What are you going to build?
LFB!