Build a Solana NFT marketplace with Metaplex
In this tutorial, you will learn everything you need to know to launch your own NFT collection on Solana using Metaplex. You will use Metaplex’s tools to upload your NFTs to Irys before setting them up to mint on Solana, finally, you will build a full website your community can use to mint your creations.
We'll be using NextJS (opens in a new tab), TypeScript (opens in a new tab), and Tailwind (opens in a new tab) for this tutorial. A basic understanding of each is essential, but you don't need to be an expert. If you're familiar with JavaScript but new to TypeScript, don’t worry, you’ll be fine. Also, you should have a basic knowledge of Github, enough to handle tasks like cloning a repository.
Prerequisites
To complete this tutorial you will need:
- A recent version of Node (opens in a new tab)
- A code editor (I use VSCode (opens in a new tab), but use whatever you prefer)
- A Solana wallet (I use Phantom (opens in a new tab), but others are fine)
- Some Devnet (not Testnet) Solana tokens, available for free from a faucet (opens in a new tab)
Metaplex
Metaplex offers a full suite of tools that simplify creating and minting NFTs on Solana.
In this tutorial you will work with:
- Sugar: A CLI for uploading NFT images and metadata
- Umi: A modular framework for building and using JavaScript that interacts with Solana
- Candy Machine: A minting and distribution program for NFT collections on Solana
Setup
Tutorial repository
To help you get going quickly and let you focus on learning how to use Metaplex with Irys, I created a Github repository with some artwork you can use for your NFTs. Additionally, I created a framework UI for the minting website.
Start by cloning this repository (opens in a new tab).
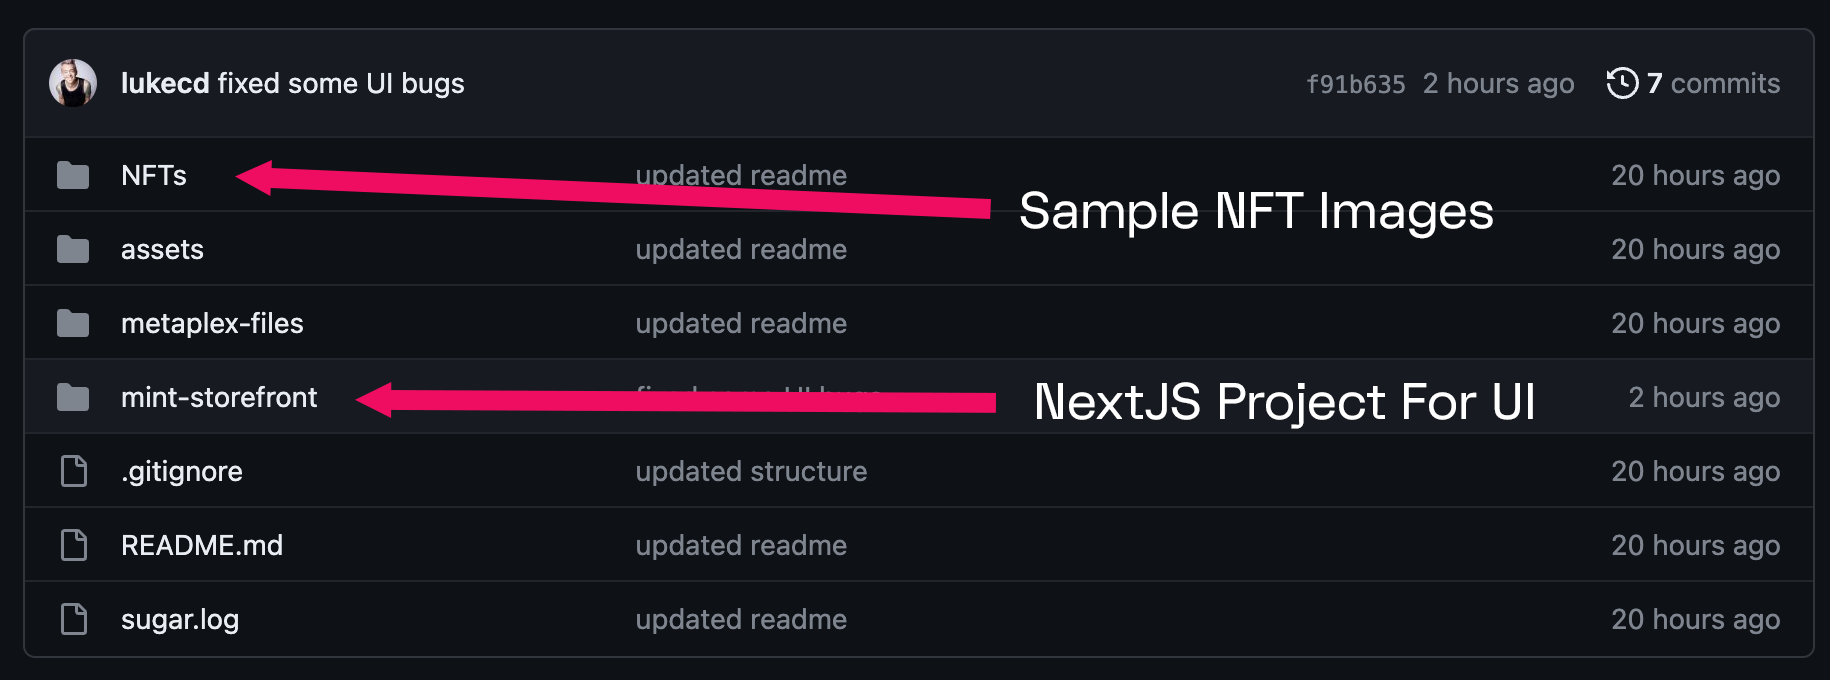
At the top-level are two folders, one called NFTs that contains 20 PNGs we'll turn into NFTs, and a second one called mint-storefront that contains the NextJS project representing the UI for the minting website.
Solana CLI
Start by installing the Solana CLI. Follow these instructions (opens in a new tab) and then return to this tutorial.
If you are not sure if you have already installed the CLI, you can try running:
solana --versionAs new versions of the CLI are constantly being released, it’s recommended you update before continuing:
solana-install updateNext setup a Solana Devnet wallet:
solana-keygen new --outfile ~/.config/solana/devnet.jsonThe results of that command will look something like this:
Wrote new keypair to /Users/luke/.config/solana/devnet.json
==============================================================================
pubkey: 69Z4dXS8aAvDhP4QDRs5C2LePnpYApZX8rvnZ69r6ic1
==============================================================================
Save this seed phrase and your BIP39 passphrase to recover your new keypair:
trend own mixture your spike keys elite run coins not lyrics fade
==============================================================================Within the results is a 12-word keyphrase that can be used to access your wallet, if you share this information with anyone they can access your funds. I decided to show mine to make this tutorial easy to follow, however, I only used the wallet while writing this tutorial.
Now switch to the Solana Devnet:
solana config set -u devnetAnd fund your wallet with free Devnet faucet tokens:
solana airdrop 2The airdrop command is sometimes unreliable. If you have trouble funding your wallet, you may need to use the Solana
Faucet (opens in a new tab). Be sure to request Devnet tokens and not Testnet tokens. You can find your wallet
address using the command solana address.
You can test that you have a balance using:
solana balanceSugar
You’ll use Metaplex’s Sugar to upload your NFT assets. Start by installing the Sugar CLI with the following command, when prompted, choose the latest version.
bash <(curl -sSf https://sugar.metaplex.com/install.sh)You may need to restart your CLI, after which you can confirm that Sugar was successfully installed by running
sugar -VPreparing your NFTS for upload
An NFT is a digital asset that combines both visual and descriptive elements. The visual part is typically represented by images or animations. The descriptive elements are in the form of a metadata file, which also contains things like the NFT’s name, symbol, and description.
When uploading assets using Sugar, you must provide them in pairs, one visual asset file paired with one metadata file.
Here’s a sample metadata file:
{
	"name": "Space Llamas #1",
	"symbol": "SPL",
	"description": "These llamas are going to the moon",
	"image": "0.png",
	"properties": {
		"files": [
			{
				"uri": "0.png",
				"type": "image/png"
			}
		]
	}
}
When setting up visual assets for Metaplex, there are specific naming conventions you must adhere to. Images must be named in a sequential, zero-indexed manner; your first image should be named 0.png, and the twentieth should be 19.png. Additionally, your collection must have a cover image that represents the entire collection, named collection.png.
For this tutorial, you have two choices for visual content. You can either use the images I've created (using Stable Difussion (opens in a new tab)), which are available in the "NFTs" directory of the Github repository or create your own.
To make things easier for you, I wrote a simple shell script that takes a batch of images, renames them, and creates a metadata file for each one.
The script is available in the GitHub repository and is named NFTs/prepareImages.sh.
Before you run the script, you may need to grant it execute permission:
chmod +x prepareImages.shTo use the script, navigate to the NFTs directory and run the script, supplying the necessary arguments:
./prepareImages.sh <folder_path> <file_extension> <name> <symbol> <description> [resize]Here's a breakdown of each command line argument:
folder_path: The path to the directory where your images are stored.file_extension: This should be either "png" or "jpg", depending on the format of the images you're working with.name: The base name for your NFTs. For images not named "collection", a number will be appended (e.g., "Space Llamas #1").symbol: A short representation of your NFT's name, such as "SPL".description: A brief description of your NFT collection.[resize]: If you provide "resize" as the sixth argument, the script will resize each image to 800x800 pixels. If you don’t have the open-source ImageMagick library installed, you will be prompted to install it. (optional)
After running the script, your images and corresponding JSON metadata files will be properly organized and prepared for uploading with Sugar. The original files are copied to an originals subfolder, which can be deleted if you no longer want them.
Name your collection anything you want, I named my collection Space Llamas and preapred them using this command:
./prepare-imges.sh assets png "Space Llamas" "SPL" "These llamas are going to the moon" resizeUploading with Sugar
Now that your images are ready to go, you’ll use Metaplex’s Sugar CLI to upload them to Irys. Again, make sure you’re in the NFTs directory, and start by creating a sugar config file:
sugar config createYou’ll be prompted with a series of questions. In the first one, if Sugar reports finding the correct number of files, press y. If you’re working with my sample images you should have 20 file pairs:
Found 20 file pairs in "assets". Is this how many NFTs you will have in your candy machine?Next, you’ll need to confirm the symbol used for your collection, press y to confirm:
Found symbol "SPL" in your metadata file. Is this value correct?Next, you’ll need to confirm the royalty you want to charge on secondary sales. The number is supplied in basis points, which are percentage times 100. To charge a 5% royalty, enter 500:
What is the seller fee basis points?Next, decide how you want to manage index generation. Candy Machine supports sequential and random mint indexes. In most cases, you will want to choose n here so that the random mint index makes it harder for botters to snipe specific NFTs:
Do you want to use a sequential mint index generation? We recommend you choose no.Each NFT collection can have a max of 4 creator wallets that payments are automatically split between, for this tutorial just choose 1:
How many creator wallets do you have? (max limit of 4) ›Enter your wallet address (you can find the wallet address you created earlier by entering solana address from a new command prompt):
Enter creator wallet address #1 ›Finally, assign 100% of revenue to that wallet:
Enter royalty percentage share for creator #1 (e.g., 70). Total shares must add to 100. ›When prompted to add extra features, just press the enter to skip:
Which extra features do you want to use? (use [SPACEBAR] to select options you want and hit [ENTER] when done) ›Metaplex uses a Solana program (equivalent of a smart contract on Ethereum) to track ownership of NFTs and gives users options about where to store the NFT assets.
For your NFT to be permanent, it must be fault-tolerant, tamperproof, and paid-for:
-
Fault-tolerant: This means that the data is stored so that it can survive unexpected events, including data corruption and loss.
-
Tamperproof: The stored data is immutable so it can’t be maliciously changed.
-
Paid-for: This means that the cost of storing the data permanently is covered up-front, and there is a mechanism for paying miners on an acceptable cadence. This provides strong incentives for storing the data forever.
Arweave is all of these things, and by using Irys to upload your NFTs to Arweave, you’re guaranteed they will be available forever. Not all of the upload options supported by Sugar offer these same guarantees of permanence, which is why we recommend always choosing Irys to upload.
Irys was previously named Bundlr (opens in a new tab). At the time this tutorial was released, the Metaplex tools still refer to us by our old name. When uploading with sugar, you can choose either Bundlr or Irys, your NFTs will still be uploaded and permanently stored on Arweave.
? What upload method do you want to use? ›
❯ Bundlr
AWS
NFT Storage
SHDW
Pinata
Select y again to make your NFTs mutable:
Do you want your NFTs to remain mutable? We HIGHLY recommend you choose yes.After the process completes, you'll see two new files in your local directory.
cache.json: Lists each NFT, including links to where your images and metadata are stored on Arweave.config.json: Contains information describing your project setup. You will need to manually modify this file to set the mint price for each NFT.
Now find this section:
"guards": null,And replace it with the following. Make sure to change the value for the destination field to the wallet address you created earlier. If you forget the value, just enter solana address from the command line.
"guards": {
	"default": {
		"solPayment": {
			"value": 0.1,
			"destination": "69Z4dXS8aAvDhP4QDRs5C2LePnpYApZX8rvnZ69r6ic1"
		}
	}
},
I've used a price of 0.1 SOL, but you can change as you want. Just be careful, don't make the price too high, you'll use Devnet SOL in your wallet to test minting. If the mint price is too high, you'll need to go back to the faucet often to get more funds.
After modifying the file, run this command to update your configuration:
sugar guard addAnd finalize your upload:
sugar uploadIrys supports payment with most popular tokens, when using the Metaplex tools the wallet you previously set up will be automatically debited with SOL to cover the costs. You should already have Devnet SOL, which is all you’ll need now. If you decide to launch your collection on Mainnet later, ensure your wallet has sufficient Mainnet SOL first.
Create and deploy a candy machine:
sugar deployAnd verify successful deployment:
sugar verifyBuilding the marketplace
Your NFTs are now uploaded to Irys and prepared to be minted on Solana. The last Metaplex tool we’ll use is Candy Machine, which handles the minting and distribution of your NFTs. If you again look at the cache.json file that was generated by Sugar when uploading, you’ll notice this section at the top.
"program": {
	"candyMachine": "CUSxUaAHZrNcuqpt1vTcpSkyAJaqHptrSLiiBAKmLFsz",
	"candyGuard": "Bjwk3LvE4FHbrV5wtkAn5Au1umBAxmVFwp8Rd6aTrtgW",
	"candyMachineCreator": "8GfTtubZ8K1q4UJBp1L5ZeahazQQSpdMjB8Gco6Xixvd",
	"collectionMint": "7K3zV7mS3XMGi7vQhwQzXnuvQDF4r56mqx7PVupntmUV"
},
This indicates that a Candy Machine instance has already been set up for your project. Note the value of the candyMachine property, you’ll need that soon.
Folder structure
Within the GitHub repository you downloaded, there is a subdirectory called mint-storefront. cd into this directory and take a look at the folder structure. As this tutorial focuses on building with Metaplex, I created a UI framework so we don’t have to spend time covering the basics of how to use NextJS and Tailwind. The NextJS project has been set up for you and the UI framework is there.
Return to your terminal and from the mint-storefront directory run:
npm installAnd then
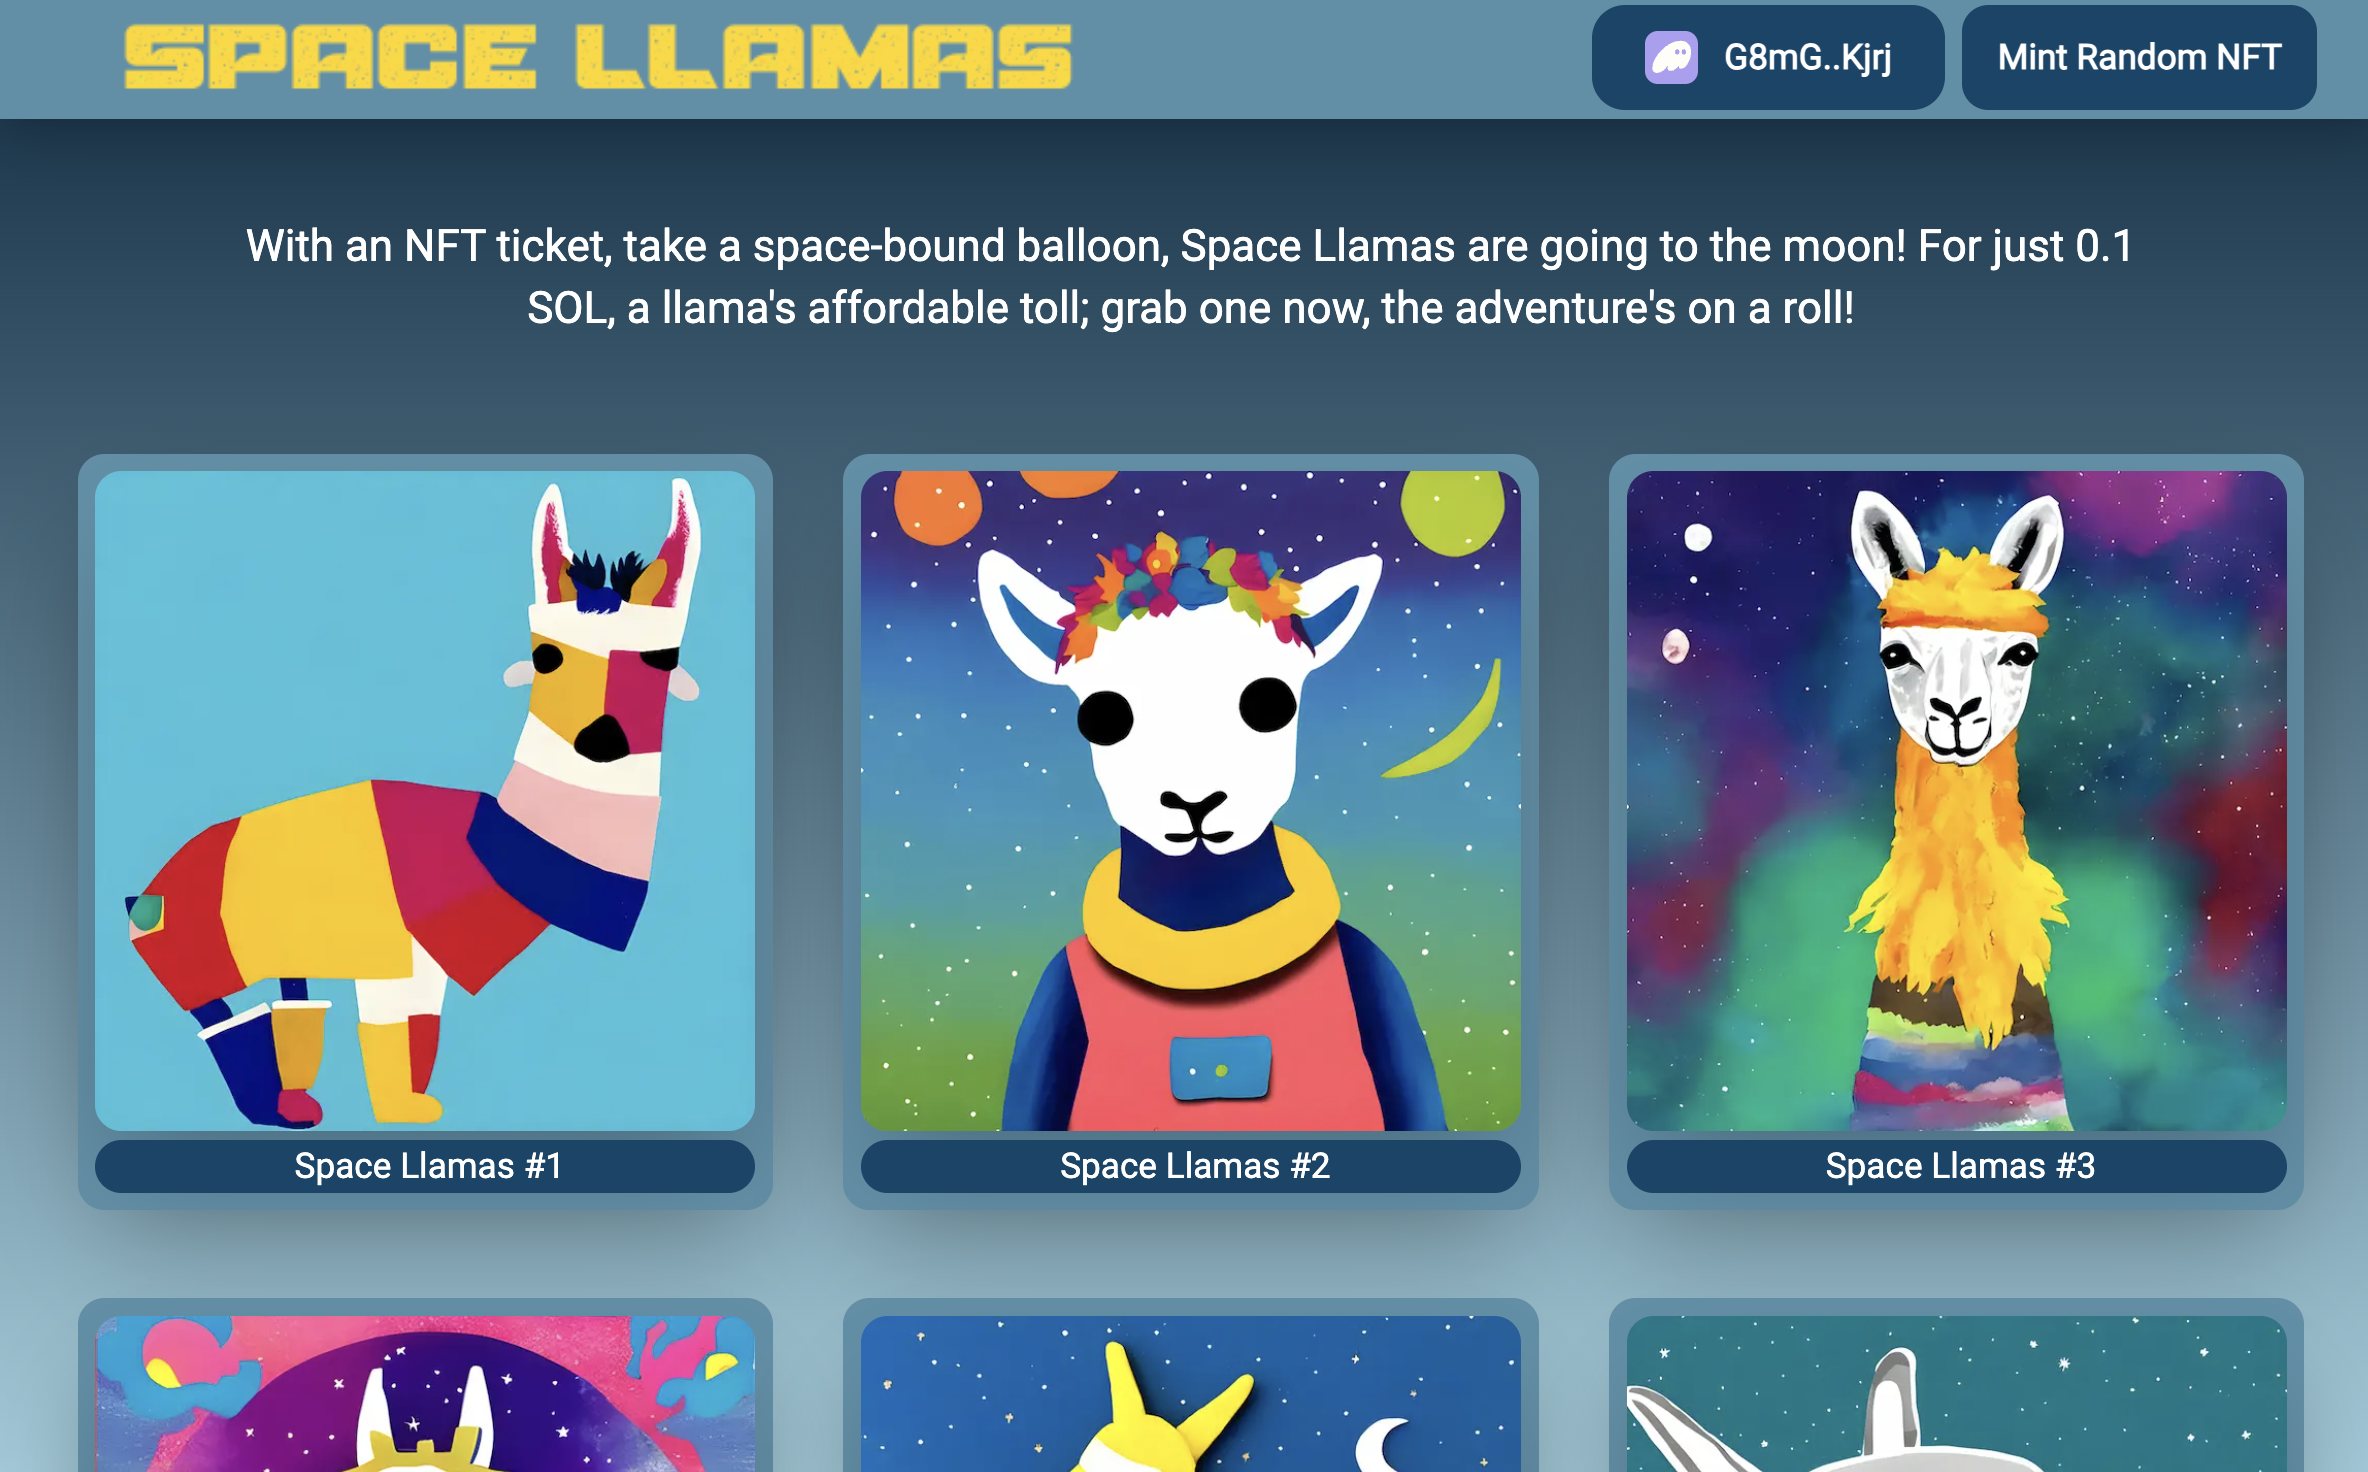
npm run devIf you open up http://localhost:3000/ (opens in a new tab) in your browser, you’ll see the beginning of the UI. The top nav is there, but the buttons don’t work yet, and the bottom preview area is empty.
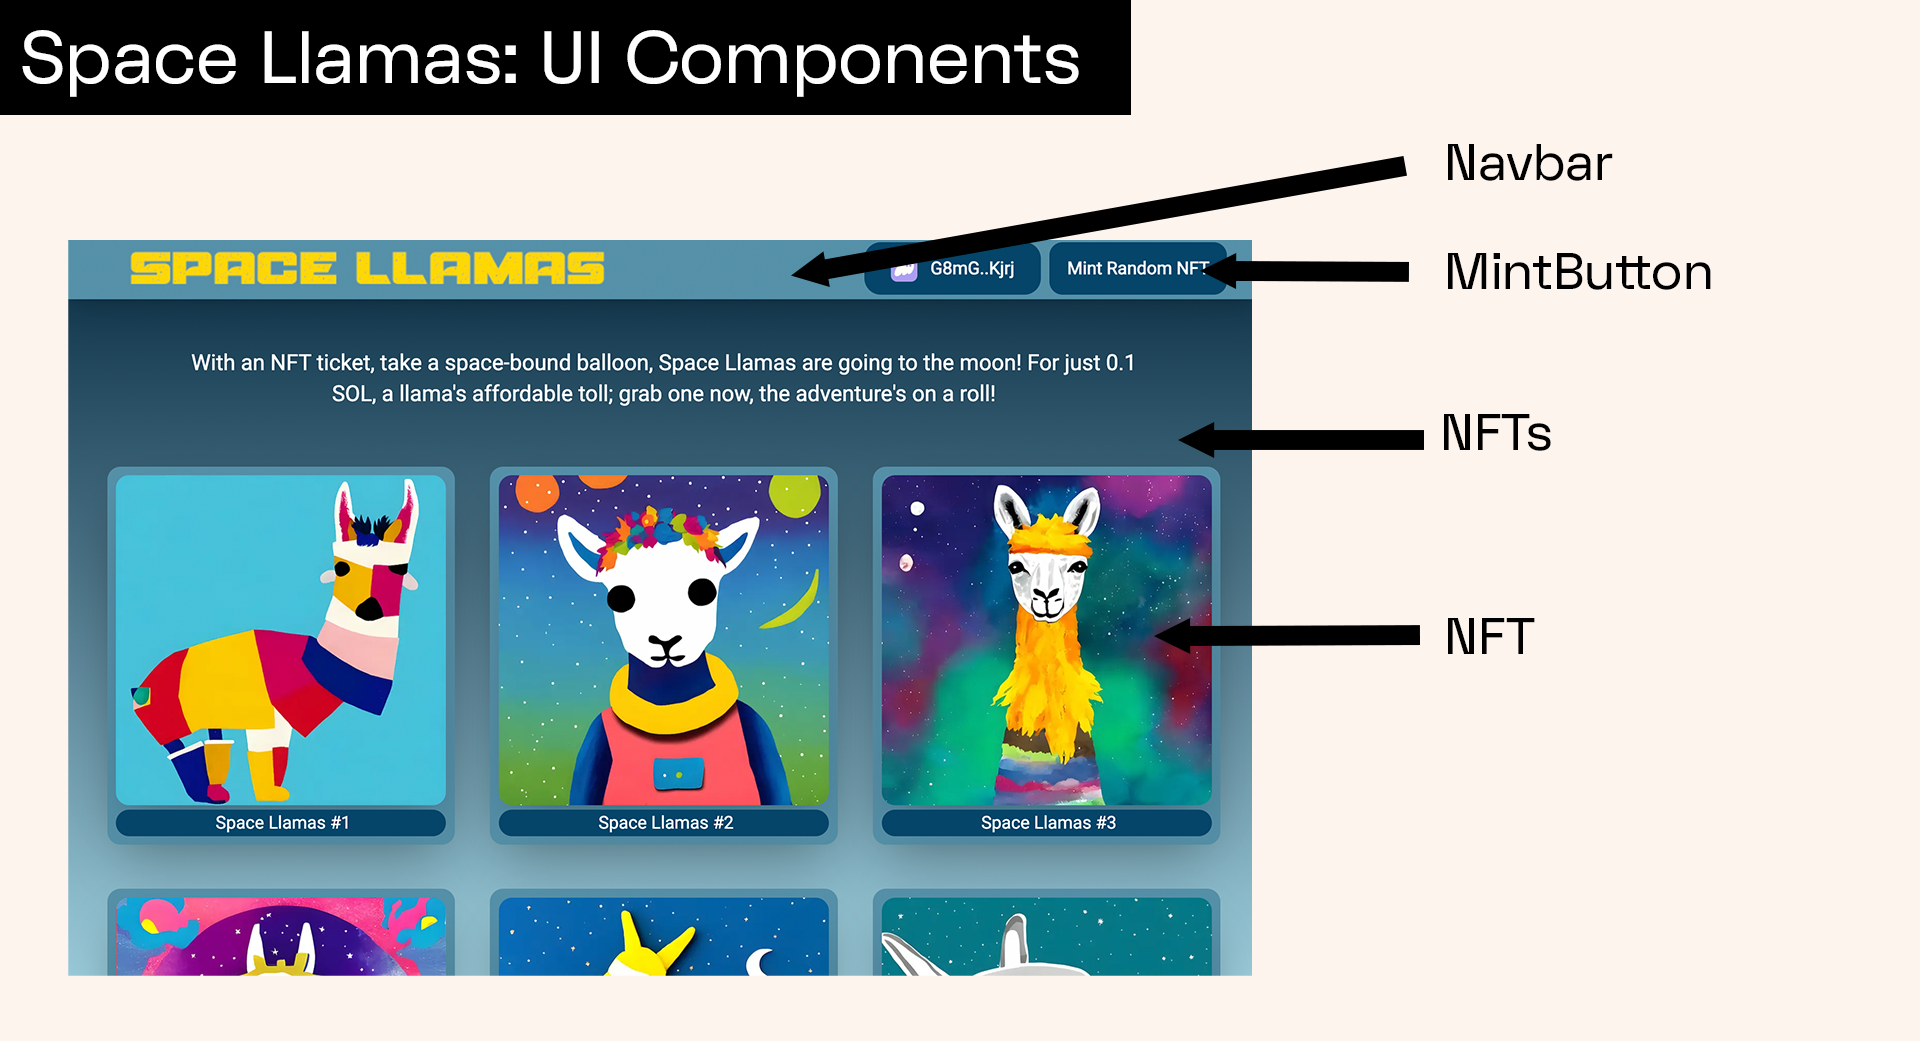
Take a moment to look through the code, both the UI components in the components folder and the utility functions in the utils folder. Focus specifically on the components highlighted in the image below, that’s where you’re going to be all of your building.
.env.local
Inside the mint-storefront directory, look for a file called .env.local.example and rename it to .env.local.
The file contains two fields:
-
NEXT_PUBLIC_RPC_URL: is where you can put a custom Solana RPC, like the fast ones from Helius (opens in a new tab). This parameter is optional, if left blank, the code will revert to using the free shared endpoints. -
NEXT_PUBLIC_CANDY_MACHINE: is where you should put the value of thecandyMachinefield from thecache.jsonfile generated by Sugar earlier.
After renaming this file and configuring the file, restart your NextJS server for them to take effect.
NEXT_PUBLIC_RPC_URL=
NEXT_PUBLIC_CANDY_MACHINE=
There are two features we need to implement in for our NFT Marketplace to be complete.
- Previewing NFTs
- Minting NFTs
Previewing NFTs: utils/loadNFTs.ts & components/NFTs
Previewing NFTs is managed by a utility function called utils/loadNFTs.ts, and a UI component called components/NFTs. The NFTs component covers the whole bottom part of the screen, and then inside that, we’ll render each individual NFT using the NFT component.
Start with the file utils/loadNFTs.ts, inside it you’ll notice an empty function called loadNFTs().
import { createUmi } from "@metaplex-foundation/umi-bundle-defaults";
import { fetchCandyMachine } from "@metaplex-foundation/mpl-candy-machine";
import { PublicKey, Pda } from "@metaplex-foundation/umi";

/**
 * Loads preview images of all NFTs in the collection
 */
export const loadNFTs = async (): Promise<string[]> => {};
The purpose of this function is to load preview images of all NFTs in our collection. To complete the function, type in the following lines between the main curly braces of the function.
const umi = createUmi(process.env.NEXT_PUBLIC_RPC_URL || "https://api.devnet.solana.com");
const candyMachine = await fetchCandyMachine(umi, process.env.NEXT_PUBLIC_CANDY_MACHINE || "");
const arrayBuilder: string[] = [];
for (let i = 0; i < candyMachine.items.length; i++) {
	arrayBuilder.push(candyMachine.items[i].uri);
}
return arrayBuilder;
In this code, we start by getting an instance to an UMI object. Since the UMI object is the conduit we use to communicate with the Solana blockchain, we need to pass it an RPC address. In my case, I’ve checked if a custom address was provided in the .env file, and either used that or a default address.
Next, we get an instance to a Candy Machine object by passing in the UMI object and the address of our Candy Machine. Finally, we extract the URI of each NFT’s metadata file and return them in an array.
With the utility function complete, swap on over to components/NFTs where we’ll call our loadNFTs() function.
At the top of the file, you’ll notice this section:
useEffect(() => {}, []);

const doLoadNFTs = async () => {};
In Next / React projects, the useEffect() function is called when a component loads. Add a single line to this function calling doLoadNFTs(), and then inside doLoadNFTs() add one line of code where you call our loadNFTs() utility function. Take the results of this and set it as React state variable called nftMetadata. Your completed code should look like this.
useEffect(() => {
	doLoadNFTs();
}, []);

const doLoadNFTs = async () => {
	setNftMetadata(await loadNFTs());
};
Return to http://localhost:3000/ (opens in a new tab) and you should see all 20 of your NFTs previewed.
Minting NFTs: utils/doMint.ts & components/MintButton
The final step before launching our NFT Marketplace is finalizing the mint function. With Candy Machine, the minting process has an element of surprise. Users can't select a specific NFT; they receive them in sequence. Often, NFT creators make some pieces rarer than others. Since users can't choose which one they’re minting, some may mint multiple times, hoping for a rarer NFT with a higher resale value.
Again starting with `utils/doMint.ts, you’ll notice an empty function.
/**
 * Mints a random NFT from the collection owned by the
 */
export const doMint = async (wallet: WalletAdapter) => {};
Replace it with this. You’ll notice it starts out similar to loadNFTs() in that it gets a reference to UMI and CandyMachine objects, but this time it goes further and executes a transaction instead of simply reading data.
export const doMint = async (wallet: WalletAdapter) => {
	// Get a reference to the UMI object, our conduit to the Solana blockchain
	const umi = createUmi(process.env.NEXT_PUBLIC_RPC_URL || "https://api.devnet.solana.com").use(mplCandyMachine());
	umi.use(walletAdapterIdentity(wallet));

	// Get a reference to our collection's unique Candy Machine
	const candyMachinePublicKey = publicKey(process.env.NEXT_PUBLIC_CANDY_MACHINE || "");

	// Get a reference to the transaction signer
	const collectionUpdateAuthority = generateSigner(umi);
	const candyMachine = await fetchCandyMachine(umi, candyMachinePublicKey);
	const nftMint = generateSigner(umi);

	// Get a reference to the collection's metadata
	const nftMetadata = await fetchMetadataFromSeeds(umi, { mint: candyMachine.collectionMint });

	// Build and execute the mint function
	await transactionBuilder()
		.add(setComputeUnitLimit(umi, { units: 800_000 }))
		.add(
			mintV2(umi, {
				candyMachine: candyMachine.publicKey,
				candyGuard: candyMachine.mintAuthority,
				nftMint,
				collectionMint: candyMachine.collectionMint,
				collectionUpdateAuthority: nftMetadata.updateAuthority,
				tokenStandard: candyMachine.tokenStandard,
				mintArgs: {
					solPayment: { destination: candyMachine.authority },
				},
			}),
		)
		.sendAndConfirm(umi);
};
Just one last piece and you’re done. Open up components/MintButton and look for this empty function.
const mintNFT = async () => {};And then type in this. The function does very little other than set a few state variables and call our doMint() function.
const mintNFT = async () => {
	// Set isLoading state variable to true
	// We use this to disable the button and show a spinner instead
	setIsLoading(true);
	try {
		// Execute our doMint function passing in the user's wallet (for signing)
		await doMint(wallet);

		// Set a state variable used to show confetti
		setShowConfetti(true);

		// Show a confirmation message
		setMessage("NFT minted, check your wallet!");
	} catch (e) {
		setMessage("Error minting NFT: " + e);
	}
	// Set isLoading state variable back to false to re-enable
	// the mint button and hide the spinner
	setIsLoading(false);
};
Testing The App
If you did everything correctly, your NFT Marketplace should now be fully functional. Make sure you’ve installed the Phantom wallet and funded it with Devnet Solana. Then, return to your browser, click Select Wallet button to connect your wallet, and the Mint Random NFT button to mint an NFT.
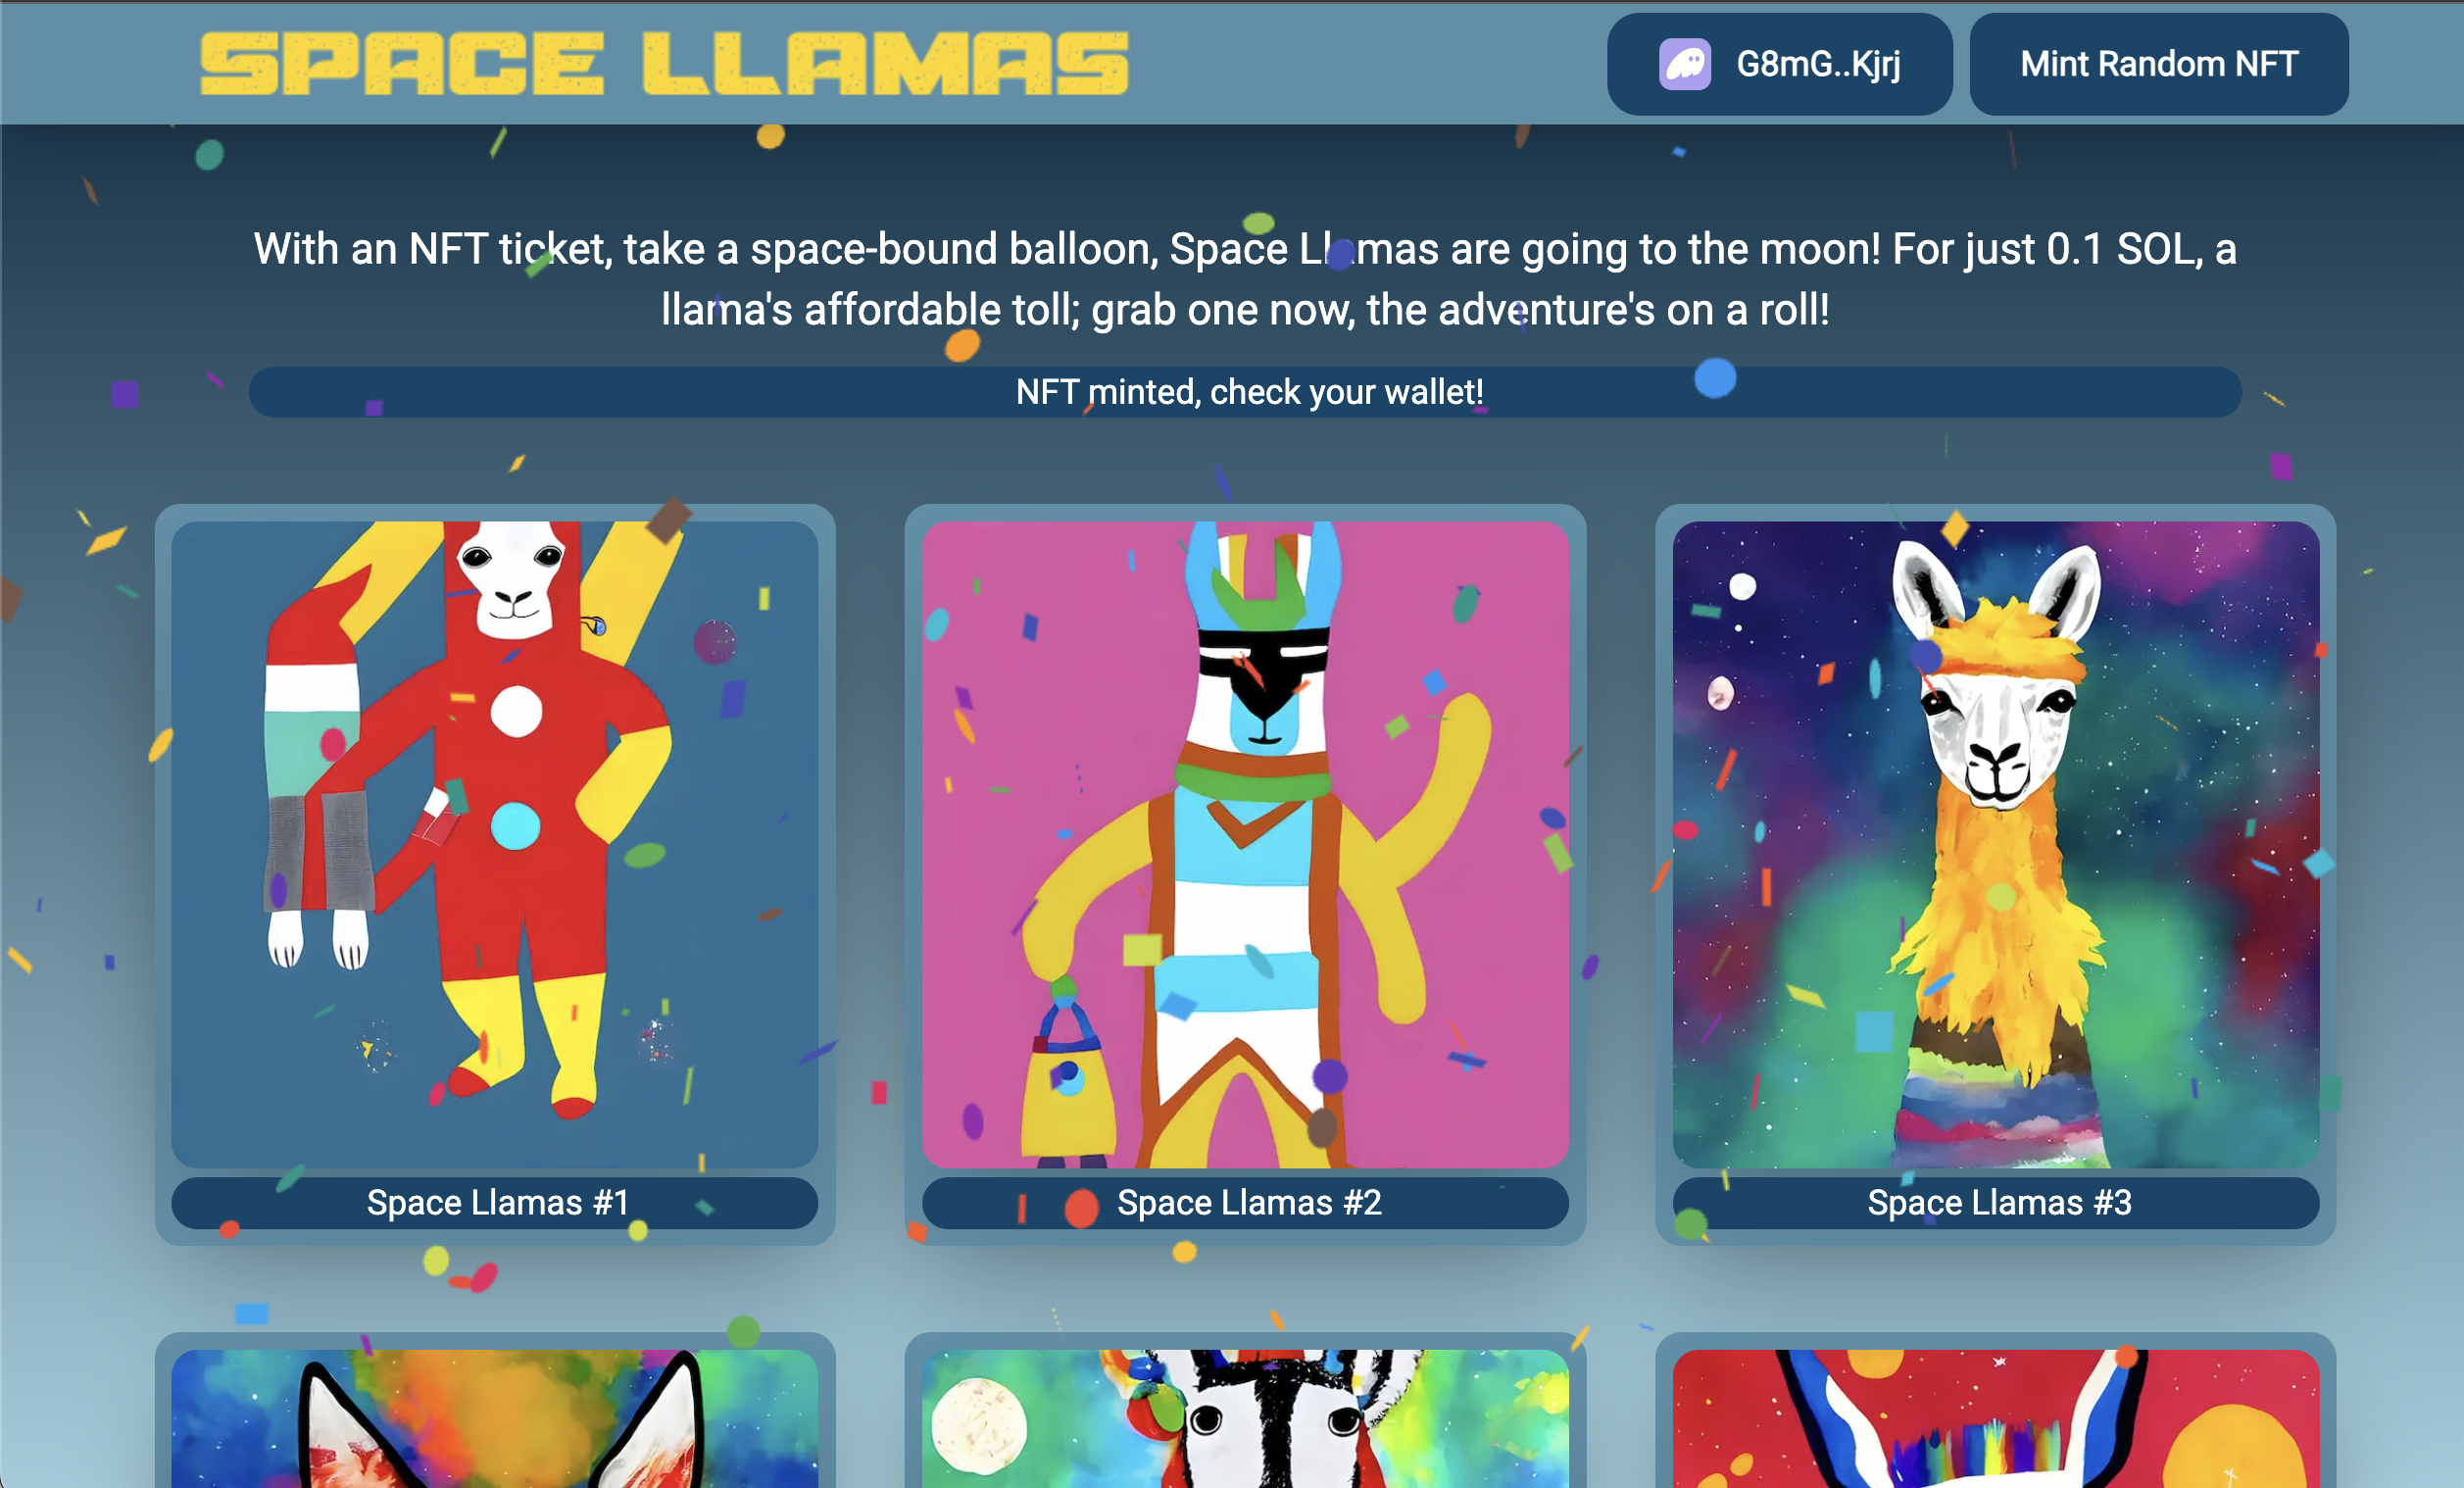
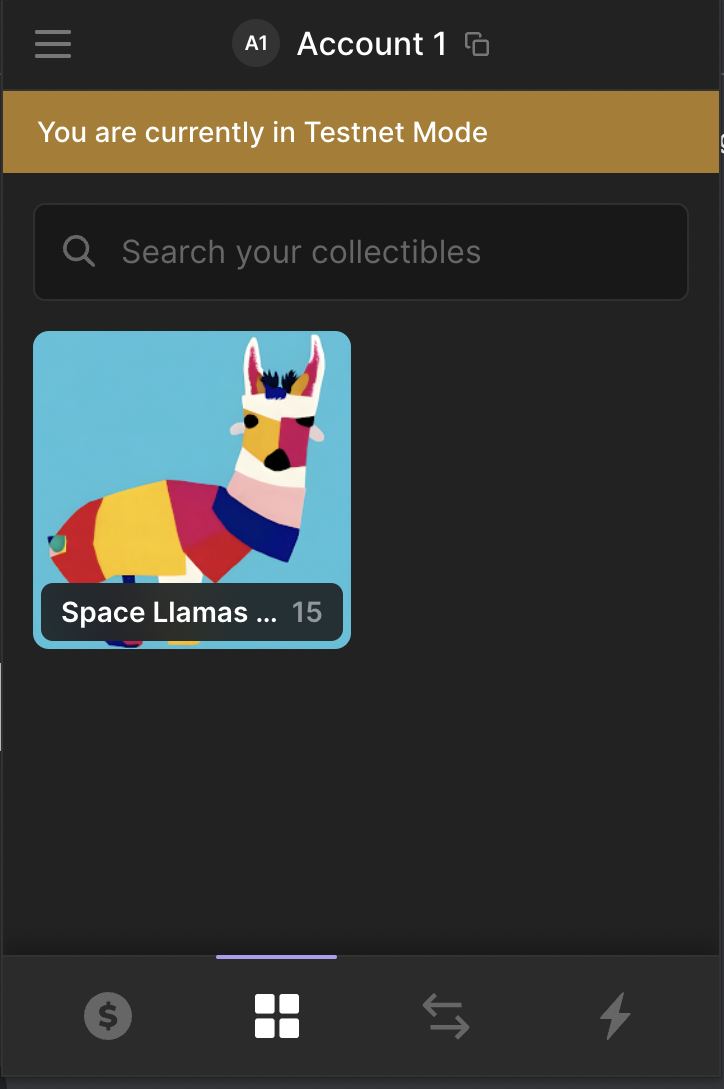
Once the confetti rains down and you see a success message, reach up and check your Phantom wallet. If everything worked properly you should see the NFTs in your wallet. It will look something like this.
Troubleshooting
If things didn’t work, again return to your code and make sure you typed everything in correctly. If you’re still stuck though, jump on over to the Irys Discord (opens in a new tab) and someone will help you debug it.
Extending Candy Machine with Guards
The purpose of this tutorial was to introduce the fundamentals of creating a Solana NFT marketplace using Metaplex and Irys. While this guide offers a foundational understanding, it doesn't cover all of Metaplex's features. For example, instead of using the Sugar CLI, you can instead set up your collection using their JS SDK.
One feature you will likely want to take advantage of to customize your collection is guards, a modular piece of code that can restrict access to the mint of a Candy Machine and add new features to it. With a variety of guards available, each can be tailored and activated as desired. While I didn’t call it out at the time, when you added a mint price of 0.1 SOL to your collection, you were configuring a guard.
For a deeper dive into guards, refer to the official documentation (opens in a new tab). Some noteworthy guards include:
- Start Date/End Date guards: Limits minting within a specific timeframe.
- Token Gate/NFT Gate guards: Allows minting only for select token or NFT holders.
- Allow List guard: Limits minting to a specified wallet list.
Thank you!
When you’re done, make sure to share some screenshots on X (Twitter) and tag us at @irys_xyz and the team at @metaplex.
LFB frens!